
 Tilda
Tilda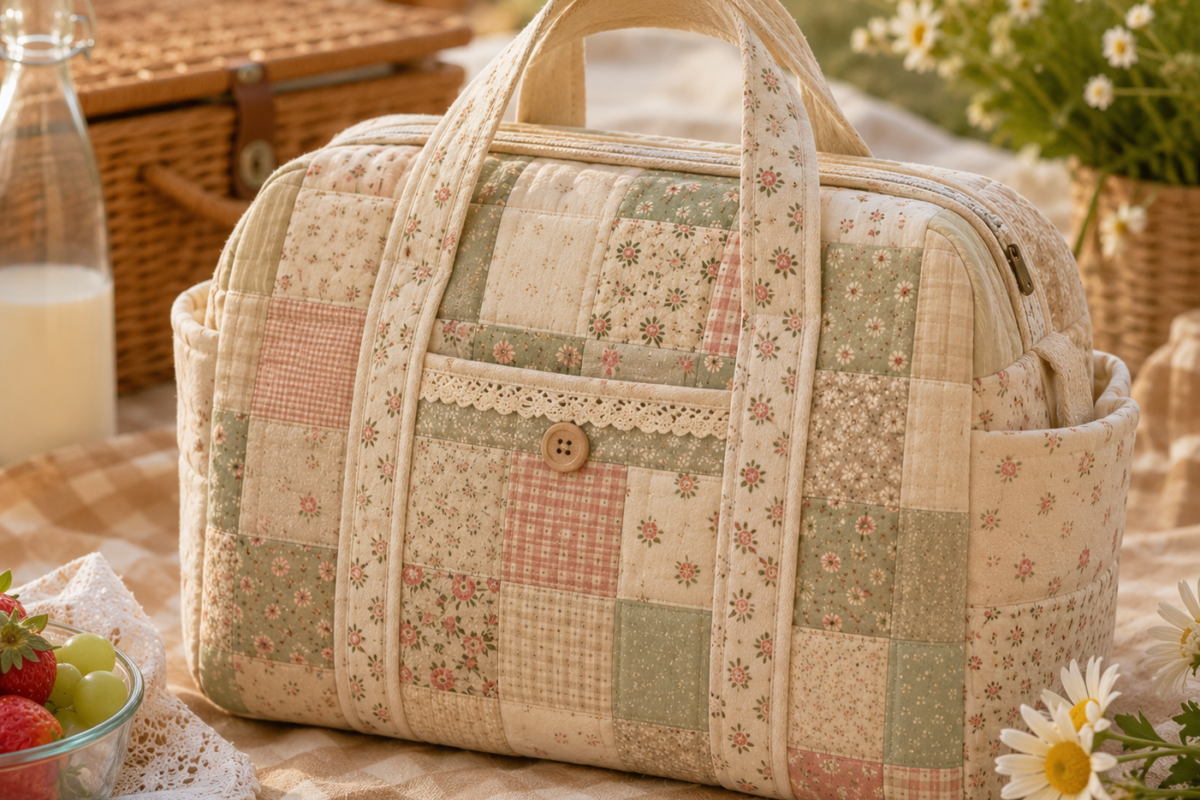
Creating a patchwork picnic bag is one of the most practical and beautiful sewing projects for beginners. A handmade picnic bag combines creativity, comfort, organization, and functionality while allowing you to practice important sewing techniques in a simple and enjoyable way. Unlike many sewing projects that are purely decorative, a picnic bag is something you can actually use for outdoor lunches, family gatherings, beach trips, parks, road trips, or weekend adventures.
Patchwork bags have become extremely popular because they bring together handmade charm and personal style. Every fabric combination creates a completely unique bag, making patchwork one of the most creative forms of sewing. Many beginners also love patchwork because it allows them to use leftover fabric scraps instead of wasting materials.
At first glance, sewing a patchwork picnic bag may seem difficult, especially for someone new to sewing. However, once the project is divided into clear and simple steps, it becomes surprisingly beginner-friendly. Most patchwork picnic bags use straight sewing lines, basic measurements, and easy fabric assembly techniques that are perfect for learning.
This complete guide explains everything you need to know about making a patchwork picnic bag step by step, including measurements in centimeters, fabric recommendations, cutting instructions, lining ideas, pocket sizes, handle measurements, sewing techniques, beginner mistakes to avoid, and professional tips that help your final result look polished and durable.
Even if you have never sewn a bag before, this tutorial will help you confidently create a cozy and beautiful patchwork picnic bag from start to finish.
Why Patchwork Picnic Bags Are Perfect for Beginners
Patchwork picnic bags are excellent beginner projects because they teach many sewing fundamentals without requiring advanced garment construction.
Unlike clothing projects that involve body fitting and complicated curves, bags mainly use:
- Straight seams
- Rectangular shapes
- Simple structure
- Basic assembly
This makes the sewing process less stressful and easier to follow.
Patchwork sewing also helps beginners improve:
- Fabric measuring
- Sewing accuracy
- Color coordination
- Ironing skills
- Cutting precision
- Sewing machine control
Another reason patchwork bags are beginner-friendly is that small imperfections usually blend naturally into the patchwork design. Tiny uneven seams often become almost invisible once multiple fabrics are combined together.
Choosing the Best Fabric for a Patchwork Picnic Bag
Fabric selection is one of the most important parts of this project because the bag must be:
- Durable
- Comfortable to carry
- Easy to clean
- Structurally stable
- Visually attractive
Choosing beginner-friendly fabrics makes the sewing process much easier.
Cotton Fabric
Cotton is the most recommended fabric for beginner patchwork projects because it is:
- Stable
- Easy to cut
- Easy to iron
- Easy to sew
Cotton also comes in thousands of prints, textures, and colors, making it ideal for creative patchwork combinations.
Medium-weight quilting cotton works especially well for picnic bags.
Canvas Fabric
Canvas is stronger and thicker than standard cotton.
Many people use canvas for:
- Bag bottoms
- Lining
- Handles
- Interior reinforcement
Canvas helps the picnic bag hold heavier items like:
- Bottles
- Plates
- Containers
- Snacks
Waterproof Fabric
Optional waterproof lining can help protect the inside of the bag from spills and moisture.
This is especially useful for:
- Cold drinks
- Fruits
- Outdoor picnics
- Beach trips
Beginners may use waterproof fabric only inside the bag while keeping patchwork cotton on the outside.
Interfacing
Interfacing is extremely important because it gives the bag structure.
Without interfacing, the bag may feel:
- Too soft
- Unstable
- Loose
- Wrinkled
Medium-weight fusible interfacing works best for beginners.
Materials You Will Need
Before starting your project, prepare all materials to make the sewing process smoother and more organized.
Fabric Requirements
For one medium picnic bag:
- 8 to 10 patchwork fabrics
- 30 x 30 cm each
- 1 meter lining fabric
- 50 cm canvas
- 1 meter interfacing
Sewing Supplies
You will need:
- Sewing machine
- Sharp fabric scissors
- Rotary cutter
- Cutting mat
- Measuring tape
- Pins or sewing clips
- Matching thread
- Iron
- Large ruler
- Fabric chalk
Optional:
- Magnetic snap
- Zipper
- Decorative labels
- Lace trim
- Ribbon
- Buttons
Recommended Picnic Bag Measurements
These measurements create a medium-sized picnic bag that is practical and beginner-friendly.
Main Body Measurements
Recommended size:
- Width: 42 cm
- Height: 32 cm
- Depth: 16 cm
This size comfortably fits:
- Food containers
- Drinks
- Small blankets
- Plates
- Picnic accessories
Handle Measurements
Recommended handle size:
- 60 cm long
- 7 cm wide before folding
Wide handles distribute weight more comfortably on the shoulders.
Pocket Measurements
Exterior Pocket
- 25 cm wide
- 20 cm high
Interior Pocket
- 20 cm wide
- 18 cm high
Pockets help organize:
- Napkins
- Keys
- Phones
- Utensils
Planning the Patchwork Design
Before cutting any fabric, organize your patchwork layout carefully.
Patchwork picnic bags often look best using:
- Soft floral prints
- Neutral fabrics
- Plaid patterns
- Cottage-inspired designs
- Vintage color palettes
Popular color combinations include:
- Beige and sage green
- Soft blue and cream
- Mustard and ivory
- Olive green and floral prints
- Red gingham with neutral tones
Beginners usually get the best results by balancing:
- Busy prints
- Simple fabrics
- Light colors
- Darker accents
Too many bold prints together may create a visually overwhelming design.
Step 1: Cutting the Patchwork Pieces
Patchwork picnic bags usually use square or rectangular pieces.
Recommended beginner square size:
- 10 x 10 cm
You may need:
- Around 60 to 80 squares
Cut carefully using:
- Rotary cutter
- Large ruler
- Flat cutting surface
Accurate cutting is one of the most important parts of patchwork sewing because uneven pieces create alignment problems later.
Take your time during this stage.
Step 2: Organizing the Layout
Lay all patchwork pieces on a large table or floor before sewing.
This allows you to:
- Balance colors evenly
- Rearrange prints
- Improve visual harmony
- Adjust the design before stitching
Many experienced quilters recommend taking a photo of the layout before sewing so you can remember the arrangement.
This stage is often one of the most enjoyable parts because you begin seeing the picnic bag design come to life.
Step 3: Sewing the Patchwork Rows
Begin sewing the squares into horizontal rows.
Use:
- Quarter-inch seam allowance
Sew slowly and carefully.
After completing each row:
- Press seams with an iron
Pressed seams create:
- Flatter surfaces
- Better alignment
- Cleaner appearance
Once all rows are complete, sew them together to form large patchwork panels.
You will need:
- Front panel
- Back panel
- Side panels
- Bottom panel
Step 4: Adding Interfacing
Place fusible interfacing behind the patchwork panels.
Use medium heat with an iron to attach the interfacing.
This step helps the bag:
- Hold its shape
- Feel sturdier
- Look more professional
Many beginners are surprised how much interfacing improves the overall structure.
Step 5: Preparing the Bag Bottom
The bottom of the picnic bag needs extra support because it carries weight.
Recommended bottom size:
- 42 cm x 16 cm
Many people use:
- Canvas
- Double interfacing
- Quilted padding
A reinforced bottom increases durability and stability.
Step 6: Sewing the Outer Bag
Attach:
- Front panel
- Back panel
- Side panels
- Bottom panel
Use:
- 1 cm seam allowance
Pin carefully before sewing.
Sew slowly around corners because accurate alignment improves the final shape.
The bag will begin looking three-dimensional during this stage.
Step 7: Making the Lining
Cut lining pieces using the same measurements as the outer bag.
You can also add:
- Inside pockets
- Zipper compartments
- Waterproof layers
Sew the lining together exactly like the outer bag.
Leave:
- A 10 cm opening at the bottom
This opening will be used later for turning the bag right side out.
Step 8: Creating the Handles
Fold the handle strips lengthwise with right sides inward.
Sew along the edge and turn right side out.
Finished handle width:
- Approximately 3 cm
Topstitch both sides for:
- Strength
- Cleaner appearance
- Durability
Handles must be reinforced carefully because picnic bags may become heavy.
Step 9: Attaching the Handles
Position handles evenly on both sides of the bag.
Recommended spacing:
- 10 cm from each side seam
Reinforce handle stitching using:
- Square stitching
- X-shaped stitching
This prevents tearing when carrying heavy items.
Step 10: Joining the Outer Bag and Lining
Place the outer bag inside the lining with right sides facing together.
Pin around the top edge carefully.
Sew slowly around the opening.
Turn the bag right side out through the lining opening.
Close the lining opening using:
- Hand stitching
- Machine stitch
- Ladder stitch
At this stage, the picnic bag finally looks complete.
Step 11: Creating Boxed Corners
Boxed corners create depth and help the bag stand upright.
Fold each bottom corner into a triangle.
Measure:
- 5 cm from the tip
Sew across the corner.
Repeat for all corners.
This creates:
- More space
- Better structure
- Professional appearance
Step 12: Adding Decorative Details
Now the creative finishing stage begins.
Popular decorative ideas include:
- Lace trim
- Fabric bows
- Handmade labels
- Decorative stitching
- Embroidery
- Wooden buttons
Patchwork picnic bags also look beautiful with:
- Cottagecore fabrics
- Rustic floral prints
- Soft vintage patterns
Simple details often create the most elegant handmade appearance.
Beginner Tips for Better Results
Use Medium-Weight Fabrics
Thin fabrics may not support heavy picnic items.
Press Seams Frequently
Ironing improves sewing precision dramatically.
Sew Slowly Around Corners
Corners require patience for cleaner alignment.
Reinforce the Handles
Strong handles are essential for durability.
Choose Harmonious Colors
Balanced fabric combinations create more professional-looking patchwork.
Common Beginner Mistakes
Uneven Patchwork Squares
Careful measuring prevents alignment issues.
Skipping Interfacing
Without interfacing, the bag may collapse too easily.
Weak Bottom Support
A reinforced bottom improves durability.
Rushing the Sewing Process
Slow sewing produces cleaner results.
Using Too Many Bold Prints
Too many busy fabrics may overwhelm the design.
Why Handmade Patchwork Bags Feel Special
A handmade picnic bag carries emotional value because every fabric piece reflects creativity and care.
Unlike mass-produced bags, patchwork creations feel:
- Personal
- Artistic
- Unique
- Handmade
Patchwork also helps reduce fabric waste by turning leftover materials into something beautiful and practical.
These bags make wonderful gifts for:
- Friends
- Family
- Outdoor lovers
- Birthdays
- Holidays
Many people treasure handmade accessories because they feel warmer and more meaningful than store-bought items.
Final Thoughts
Making a patchwork picnic bag for beginners is a rewarding sewing project that combines creativity, functionality, and beginner sewing skills in one beautiful handmade accessory.
By using beginner-friendly techniques, accurate measurements, durable fabrics, and patience, anyone can create a stylish and practical picnic bag step by step.
The beauty of patchwork lies in its uniqueness. Every fabric combination creates a completely different result filled with personality and handmade charm.
Start simple, enjoy the process, and allow yourself to learn naturally with every stitch. Your first patchwork picnic bag may become not only a practical accessory but also the beginning of many future sewing and patchwork projects.