

Making your first quilt is an exciting and rewarding experience. While quilting may seem complicated at first, breaking the process into clear, manageable steps makes it much easier to learn. You don’t need advanced skills or expensive tools — just patience, basic supplies, and a willingness to practice.
This beginner-friendly guide walks you through how to make your first quilt step by step, from choosing fabric to finishing your quilt with confidence.
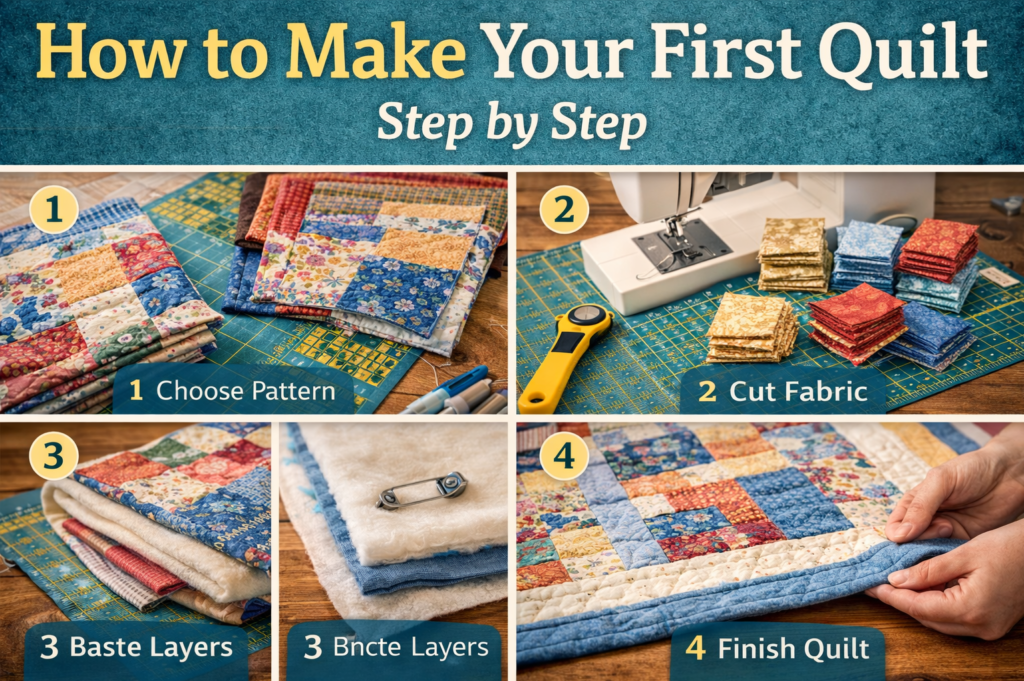
Step 1: Choose a Simple Quilt Pattern
For your first quilt, simplicity is key. Starting with an easy pattern helps you focus on learning the basics without feeling overwhelmed.
Best Quilt Patterns for Beginners
- Square patchwork quilts
- Strip quilts
- Pre-cut fabric patterns (charm packs or jelly rolls)
Avoid complex shapes, curves, or intricate designs at the beginning. Straight lines are your best friend when learning.
Step 2: Select Your Fabric
Choosing the right fabric makes a big difference in how easy your first quilt will be.
Beginner Fabric Tips
- Use 100% cotton quilting fabric
- Stick to 2–3 coordinating colors
- Avoid slippery, stretchy, or thick fabrics
- Pre-wash fabric to prevent shrinking later
Pre-cut fabric bundles are especially helpful for beginners because they save time and reduce cutting mistakes.
Step 3: Cut Your Fabric Pieces
Accurate cutting is essential for a quilt that fits together properly.
Tools You’ll Need
- Rotary cutter
- Cutting mat
- Quilting ruler
Take your time, measure carefully, and double-check before cutting. Precision at this stage prevents problems later.
Step 4: Sew the Quilt Top
This step is known as piecing, where individual fabric pieces are sewn together to create the quilt top.
Piecing Tips for Beginners
- Use a consistent ¼-inch seam allowance
- Sew pieces together row by row
- Press seams after each step
Pressing is just as important as sewing. It helps quilt blocks line up correctly and improves the overall look of your quilt.
Step 5: Prepare the Quilt Sandwich
The quilt sandwich consists of three layers:
- Quilt top
- Batting
- Backing fabric
Lay all layers flat on a large surface and smooth out any wrinkles before moving on.
Step 6: Baste the Quilt Layers
Basting temporarily holds the quilt layers together so they don’t shift during quilting.
Beginner-Friendly Basting Methods
- Safety pin basting
- Spray basting
- Hand basting
Pin basting is the easiest and most reliable method for beginners.
Step 7: Quilt the Layers Together
Quilting stitches all three layers into one finished piece.
Easy Quilting Options for Beginners
- Straight-line quilting
- Stitching along seam lines
- Simple grid patterns
Decorative designs are not necessary for your first quilt. Focus on control and consistency.
Step 8: Trim and Square the Quilt
Once quilting is complete, trim the excess batting and backing fabric.
- Make sure edges are straight
- Carefully square the corners
This step prepares your quilt for binding and gives it a clean, polished shape.
Step 9: Bind the Quilt Edges
Binding finishes the edges of the quilt and holds all layers together.
Beginner Binding Tips
- Use pre-made binding or straight fabric strips
- Sew slowly and carefully
- Miter corners one at a time
Binding can take practice, so don’t worry if it’s not perfect the first time.
Step 10: Final Press and Enjoy
Give your finished quilt a final press and take a moment to admire your work. Every first quilt is unique, and small imperfections are part of the learning process.
Final Thoughts
Learning how to make your first quilt step by step is about progress, not perfection. Each quilt teaches you new skills and builds confidence. Start simple, practice often, and enjoy the creative journey.
Your first quilt is just the beginning.